Easy CSS Ribbons / Banners (with an assist from SVG)
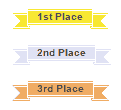
Ribbons, banners, whatever you’d call them. Put some text inside a ribbon using only markup like this:
<span class="ribbon">1st Place</span>
<span class="ribbon silv">2nd Place</span>
<span class="ribbon brnz">3rd Place</span>
And it should look like this:

So I created a fairly simple ribbon vector image using Adobe Illustrator, saved to SVG format, and hand-edited it to this:
<svg version="1.1" xmlns="http://www.w3.org/2000/svg"
  xmlns:xlink="http://www.w3.org/1999/xlink"
  width="36" height="122" viewBox="0 0 36 122">

  <defs>
    <style>
      .gold   { fill: #f8e833; }
      .silver { fill: #e0e2f4; }
      .bronze { fill: #f0ac64; }
    </style>

    <g id="ribbon">
      <rect x="0" width="36" height="16"/>
      <rect y="1" fill="#fff" width="36" height="1"/>
      <rect y="14" fill="#fff" width="36" height="1"/>

      <g id="end">
        <polygon points="0,40 18,40 18,20 16,20 16,24 0,24 8,32"/>
        <polygon fill="#fff" points="15,25 1,25 2,26 15,26 15,37
          16,38 2,38 1,39 17,39 18,40 18,39 16,37 18,37 18,36 16,36
          16,35 18,35 18,34 16,34 16,24 15,24"/>
        <rect x="16" y="21" fill="#fff" width="2" height="1"/>
      </g>

      <use xlink:href="#end" transform="translate(36) scale(-1,1)"/>
    </g>
  </defs>

  <use xlink:href="#ribbon" class="gold"/>
  <use xlink:href="#ribbon" class="silver" transform="translate(0,41)"/>
  <use xlink:href="#ribbon" class="bronze" transform="translate(0,82)"/>
</svg>
My aim was to get maximum reuse of the pieces that make up the ribbon, so for example I only define one ribbon end and reuse it by moving (translate) and mirroring (scale) it to create the other end. I replicate the ribbon multiple times, each with a different fill color to create different color ribbons. The SVG above looks like this:
Then the final piece of the puzzle, the CSS:
.ribbon {
  font: bold 10px/16px sans-serif;
  padding: 0 7px;
  position: relative;
  display: inline-block;
  background: url(ribbon.svg);
  color: #444;
  margin: 0 18px;
}
.ribbon:before,
.ribbon:after {
  content:" ";
  position: absolute;
  display: block;
  height: 20px;
  width: 18px;
  top: 0;
  background: url(ribbon.svg) 0 -20px;
}
.ribbon:before {
  left: -18px;
}
.ribbon:after {
  right: -18px;
  background-position: -18px -20px;
}

.silv {
  background-position: 0 -41px;
}
.silv:before {
  background-position: 0 -61px
}
.silv:after {
  background-position: -18px -61px
}

.brnz {
  background-position: 0 -82px;
}
.brnz:before {
  background-position: 0 -102px
}
.brnz:after {
  background-position: -18px -102px
}
This slices and dices up the SVG, using the pseudo elements before and after to display the ribbon ends. The middle part with the text will stretch or shrink to fit. You can now use the simple HTML markup at the top to enribbon your text. It would be pretty simple to create a SASS mixin to spit out the above CSS for different colors, if you want to make it even easier. You could add as many colors as you want to the SVG, like:
...

      .c1 { fill: #F26C4F; }
      .c2 { fill: #FBAF5C; }
      .c3 { fill: #FFF467; }
      .c4 { fill: #7CC576; }
      .c5 { fill: #438CCA; }
      .c6 { fill: #855FA8; }

...

  <use xlink:href="#ribbon" class="c1" transform="translate(0,123)"/>
  <use xlink:href="#ribbon" class="c2" transform="translate(0,164)"/>
  <use xlink:href="#ribbon" class="c3" transform="translate(0,205)"/>
  <use xlink:href="#ribbon" class="c4" transform="translate(0,246)"/>
  <use xlink:href="#ribbon" class="c5" transform="translate(0,287)"/>
  <use xlink:href="#ribbon" class="c6" transform="translate(0,328)"/>
</svg>
Which would look like:

