Load Many Images in a Single Request (Optimization)
Some pages on GoToQuiz.com generate many requests to retrieve many thumbnail-sized images. Each image file is only 1 – 5 KB in size. I wanted to reduce the penalty associated with making numerous requests, so I came up with a way to combine these into a single request.
I needed a solution to retrieve an arbitrary number of images, which may vary with each pageview. I considered generating an image sprite on the fly, but this approach came with several problems:
- Constantly invoking image functions on the server, adding more overhead
- Image display would require using background-image and CSS manipulation
- Image display would also depend on meta data about each image, to correctly set the necessary CSS values
- Images may be different heights and widths, further complicating sprite generation
So instead, I went with returning the image data base64-encoded in a JSON format. It works like this. The HTML will have elements each holding the URI of the image as a data element rather than in <img src=”…”>.
<div class="gImg imgSwapHiPri" data-imgpath="/upic/2017/21/Mn8rrw.T1.jpg"></div>
In this case, it’s a certain kind of thumbnail styled with .gImg to have a specific height, width, and generic default background. The .imgSwapHiPri class is used to tag all elements to have their images swapped in.
And here’s the jquery plugin I wrote, to be called on pageload:
(function($, dataAttr) {

    $.lazyImage = function($swaps, alt) {
        $swaps = $($swaps);

        var thumbs = $swaps.map(function() {
                return $(this).data(dataAttr);
             }).get();

        if (thumbs.length !== 0) {
            $.get('/img/image-set.json', {"paths[]": thumbs}, function(json) {
                $swaps.each(function(i, el) {
                    if (el.tagName === 'IMG')
                        el.src = json.base64[i];
                    else
                        el.innerHTML = '<img src="'+ json.base64[i] +'" alt="'+ (el.getAttribute('data-alt') || alt || '') +'">';
                });
            });
        }
    };

})(jQuery, 'imgpath');
Very simple. Invoked with $.lazyImage(‘.imgSwapHiPri’);. You can pass an optional alt attribute value, or optionally set a data-alt attribute per element. This script checks if the element to be swapped is an IMG tag; if so, set it’s src attribute. If not, set its innerHTML to an IMG tag. Either way, the image data is set to be the base64-encoded image returned by /img/image-set.json.
Let’s take a look at what’s happening in /img/image-set.json’s PHP code. I’ve got some framework boilerplate in the actual script, but the main bit is this:
const WEB_ROOT = '/path/to/public_html/';
$paths = $_POST['paths'];
$b64 = array();

//fill an array with the base64-encoded images
foreach ($paths AS $path)
    $b64[] = base64EncodeImg($path);

header('Content-type: application/json');

echo '{"base64":';
echo json_encode($b64);
echo '}';

//function to convert image path to base64 data
function base64EncodeImg($path) {
    //first ensure the image path contains only legal characters
    if (preg_match('@^([-_/a-z0-9]+\.)+(png|jpg|gif|svg)$@i', $path)) {
        //absolute path to file
        $path =  WEB_ROOT . (strpos($path, '/') === 0 ? substr($path, 1) : $path);

        if (file_exists($path)) {
            $type = pathinfo($path, PATHINFO_EXTENSION);
            $data = file_get_contents($path);
            return 'data:image/' . strtolower($type) . ';base64,' . base64_encode($data);
        }
        else
            return '';
    }
    else
        return '';
}
The data generated by the code above is a simple JSON file containing an array of base64-encoded images. Critically, it is generated in the same order as the elements in the HTML. This allows the jquery plugin to easily match base64 data with the appropriate element just by iterating over them.
And that’s really all there is to it. When the pageload event fires, the jquery plugin is called and makes the request for, say, a dozen images. The image data is returned in one JSON response–typically under 30KB in my case with JSON gzipping turned on (mod_deflate)–and it is fast.
BONUS:
If you have alternate high resolution versions of images for high DPI screens, this modified version of the above jquery plugin has your back.
(function($, dataAttr) {

    $.lazyImage = function($swaps, alt) {
        $swaps = $($swaps);

        var hdpi = window.devicePixelRatio || 1 > 1.3,
            thumbs = $swaps.map(function() {
                var $this = $(this);
                return hdpi ? $this.data(dataAttr + 'H') || $this.data(dataAttr) : $this.data(dataAttr);
             }).get();

        if (thumbs.length !== 0) {
            $.get('/img/image-set.json', {"paths[]": thumbs}, function(json) {
                $swaps.each(function(i, el) {
                    if (el.tagName === 'IMG')
                        el.src = json.base64[i];
                    else
                        el.innerHTML = '<img src="'+ json.base64[i] +'" alt="'+ (el.getAttribute('data-alt') || alt || '') +'">';
                });
            });
        }
    };

})(jQuery, 'imgpath');
In this case, the plugin checks if the screen is high DPI and checks each element to see if there is a data attribute called “data-imgpath-h”. If so, it uses this instead of the value of “data-imgpath”. The value of data-imgpath-h is the path to the high resolution version of the image.
A Super-Lightweight jQuery Toast Plugin
Looking for a lightweight toast jQuery plugin? Here’s a super simple one I wrote for this site, called gtqToast. It minifies to just 520 bytes.
(function($) {
    'use strict';

    var $toastList = $('<ul id="gtqToast"></ul>').appendTo('body');

    //register the plugin
    $.fn.gtqToast = function(options) {

        var settings = $.extend({},
                                {fade:      500,
                                linger:    4000},
                                options),
            $toast = $('<li style="position:absolute;visibility:hidden;"></li>')
                            .appendTo($toastList),
            $container = $('<div></div>')
                            .html(this)
                            .appendTo($toast),
            height = $toast.height();

        $container.hide();
        $toast.css({display: 'none',
                    position: 'static',
                    visibility: 'visible',
                    height: height})
            .slideDown(160, function() {
                $container.fadeIn(settings.fade)
                    .delay(settings.linger)
                    .fadeOut(settings.fade, function() { $toast.remove(); });
            });
    };

    $.gtqToast = function(text, options) {
        $('<span></span>').text(text).gtqToast(options);
    };

})(jQuery);
It needs this bit of CSS as well (note that I assume you use a CSS reset, otherwise you’ll want to add properties like list-style: none):
#gtqToast { position: fixed;
            bottom: 10%;
            z-index: 102;
            text-align: center;
            width: 100%; }
#gtqToast div { display: inline-block;
                background: rgba(0,0,0,0.75);
                color: #fff;
                font-size: 15px;
                font-weight: bold;
                padding: 14px 20px;
                border-radius: 20px;
                box-shadow: 3px 3px 9px 1px rgba(0,0,0,0.3);
                margin-top: 8px; }
What the plugin does: inserts an empty ul (unordered list) tag into the DOM with a fixed bottom position 10% up from the bottom of the viewport. This list will hold the toasts. You can trigger a toast in two ways.
// #1, call on a jQuery object
$('<span>This is my toast</span>').gtqToast();

// #2 call with text
$.gtqToast('Another toast, yay!');
These calls will add the toast to our list and fade them in. If you look at the plugin code, I actually add a div inside the li to contain the toast message. Plus you’ll notice some weird CSS changing. I did this to account for multiple toasts becoming visible at the same time. What will happen is, existing toasts will slide upward when a new toast is added, then the new toast will fade in.
There are only two settings you can change on this basic plugin: fade is the fade in/out speed, and linger is the length of time the toast will stay on the screen. The defaults should be fine for most cases.
Feel free to use this if it fits your needs!
Web Page Optimization – Changes I Made for Page Loading Speed
It has been years since I optimized the page loading speed at GoToQuiz. At that time, image sprites and CSS/javascript minification were the state of the art. In the intervening years, though, further progress has been made. Of particular note is the “retirement” of older versions of Internet Explorer, and the emergence of CSS3 and HTML5, which allows developers the ability to further streamline their sites. So as I am in the process of revamping the UI, I’m taking advantage of the latest techniques to boost page loading speed. Be aware, this is nothing revolutionary–this blog post is simply an overview of which changes I’m making, and why.
Migrating pages over to HTML5 allows the markup to be more semantic while taking fewer bytes–a double win. Using tags such as nav, section and article helps alleviate so-called “div-itis”, allowing cleaner markup and a smaller overall filesize. HTML5 also follows the maxim of “convention over configuration”, letting you eliminate unnecessary attributes like type=”text/javascript” on script tags, for example.
The adoption of CSS3 has provided many possibilities for creating beautiful visual effects without using image files. Here is an example: on an early iteration of the design of the various headings on GoToQuiz, I used this sprite combined with CSS to create the rounded color bar appearance.
Simple, Light-Weight Radio Button Replacement jQuery Plugin
I was looking for a jQuery plugin to replace the standard browser radio buttons with custom images, but I had a few requirements. 1) Tabbing and focus had to function correctly, and 2) the javascript had to be light-weight. After looking into some heavy plugins and some simple ones that didn’t handle tabbing/focus properly, I decided to roll my own.
Here’s the plugin code, with comments:
(function($) {
    // source: http://www.gotoquiz.com/web-coding/
    'use strict';

    //the plugin
    $.fn.niceRadio = function(options) {
        if (this.length !== 0) {
            //initialize settings & vars
            var settings = $.extend(
                {   baseClass:      'nr_base',
                    focusClass:     'nr_focus',
                    checkedClass:   'nr_checked'},
                options),
                $radios = this,
                $aset = $();

            $radios.each(function(i, el) {
                var $radio = $(el),
                    //create an anchor per radio that will be our radio replacement
                    $a = $('<a href="#" id="nr_a'+ i +'" data-nr-id="'+ i +'" class="'+
                            settings.baseClass +' nr_for_'+ $radio.attr('name') +
                            '" tabindex="-1"></a>');

                //give each radio a custom class with a counter (nr_r#) for easy lookup
                $radio.addClass('nr_r'+ i)
                    //store the counter value as data as well
                    .data('nrId', i)
                    //insert the anchor immediately after the radio
                    .after($a)
                    //hide the radio visually
                    .css({position: 'absolute', 'margin-left': -2999});

                //if radio was already checked, add the checked class to it's replacement
                if ($radio.is(':checked'))
                    $a.addClass(settings.checkedClass);

                //collect the set of anchors as they are created
                $aset = $aset.add($a);
            });


            //when an anchor is clicked...
            $aset.click(function(e) {
                e.preventDefault();

                //$clicked is the anchor
                var $clicked = $(this),
                    //$checked is the radio to be checked
                    $checked = $('.nr_r'+ $clicked.data('nrId'));

                //check it
                $checked.prop('checked', true)
                    //focus it
                    .focus()
                    //trigger the change event on it
                    .change();
            });


            //when a radio received focus, add the focus class to its replacement
            $radios.focus(function() {
                $('#nr_a'+ $(this).data('nrId')).addClass(settings.focusClass);
            })
            //when a radio loses focus, remove the focus class from it's replacement
            .blur(function() {
                $('#nr_a'+ $(this).data('nrId')).removeClass(settings.focusClass);
            })
            //when a radio is changed, call the changeEvent function
            .change(function() {
                changeEvent($(this));
            });


            return $radios;
        }

        //called when a radio selection changes
        function changeEvent($radio) {
            //if $radio is checked...
            if ($radio.prop('checked')) {
                //remove checked class from any other anchor associated with
                //radios of the same name
                $('.nr_for_'+ $radio.attr('name')).removeClass(settings.checkedClass);
                //add checked class to this radio's replacement
                $('#nr_a'+ $radio.data('nrId')).addClass(settings.checkedClass);
            }
            else
                $('#nr_a'+ $radio.data('nrId')).removeClass(settings.checkedClass);
        }
    };

})(jQuery);
This requires some CSS rules, which might look like:
.nr_base		     { display: inline-block;
                       height: 16px;
                       width: 16px;
                       background: transparent url(radio_sprite.png) no-repeat 0 0;
                       vertical-align: middle; }
.nr_checked	         { background-position: -16px 0; }
.nr_focus		     { outline: 1px dotted #555; }
.nr_checked.nr_focus { outline: none; }
Minified, this radio replacement plugin shrinks to under 1KB. It handles tabbing and focus properly, for both screen readers and keyboard users. It handles radio changes via clicking associated labels. And by using an anchor tag to hold the radio replacement image, it handles the odd browser that does not treat labels as clickable (a problem with some of the other radio replacement plugins I encountered).
Feel free to use this plugin as you like, and I hope it proves useful! Let me know if you find any bugs or particular browser quirks.
Make Rainbow-Colored Lists (and other HTML elements) – jQuery plugin
How to make rainbow-colored lists? I started searching for a solution and found a plugin for rainbow text, which inspired me to write my own jQuery plugin to rainbow-ify lists and other sets of HTML elements.
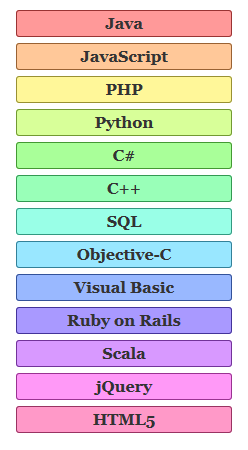
I’m used to working with RGB hex color codes. But there is no intuitive way to generate a spectrum of color using RGB, so I turned to HSL (hue, saturation and lightness). Most modern browsers support colors specified with hsl(hue, saturation%, lightness%), although IE versions prior to 9 do not. So I started out using HSL, adding IE support later. I found that keeping the saturation and lightness constant at 100% and 80% respectively while increasing the hue in steps produces a really nice rainbow effect.
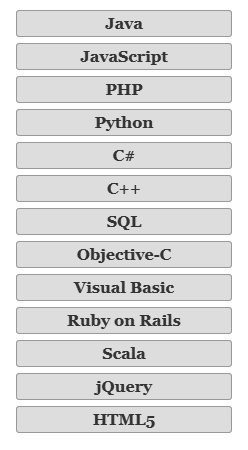
Let’s back up a bit. Consider the following styled list:
I’d like to color this list to look like a rainbow. Using CSS alone is unwieldy; without knowing in advance the number of elements in the list, it’s impossible. We need to use Javascript to get this result:
Here’s how I did it–my rainbow plugin code (~1KB when minified):
jQuery Shake Plugin to, er, Make Elements Shake
I wanted to make a submit button shake back and forth when the form input is invalid, signaling the user that there was a problem. Simple enough. So I googled around for an existing solution, but the jquery plugins I found only made elements vibrate like crazy. I wanted a left-right shake.
Well it turned out to be very easy to implement myself. Minified, my shake jquery plugin is less than 0.5KB. Here’s a demo page. Here’s the code:
(function($) {
    'use strict';

    //the plugin call
    $.shake = $.fn.shake = function(options) {
        if (this.length !== 0) {
            //initialize settings & vars
            var settings = $.extend(
                {   distance:   12,
                    iterations: 3,
                    duration:   160,
                    easing:     'swing'},
                options),
                $shakeThis = this;

            return $shakeThis.each(function(i, el) {
                var $el = $(el),
                    marg = ($el.parent().width() / 2) - ($el.outerWidth() / 2);

                $el.css('margin-left', marg);
                for (var j = 0; j < settings.iterations; j++)
                    leftRight($el, marg);

                $el.animate({'margin-left': marg}, settings);
            });
        }

        function leftRight($el, marg) {
            $el.animate({'margin-left': (marg - settings.distance)}, settings)
               .animate({'margin-left': (marg + settings.distance)}, settings);
        }
    };

})(jQuery);
Highlight words in text with jQuery
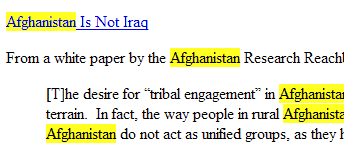
 On the right is an example of word-highlighting in a blog post, done with jQuery (my javascript library of choice). I needed to highlight certain words in blocks of formatted text, so I went searching for an existing solution. I found a pretty good starting point, posted by bjarlestam on Stackoverflow. His highlighting function is below. It wraps the word inside a span tag with a class of your choosing.
jQuery.fn.highlight = function (str, className) { var regex = new RegExp(str, "gi"); return this.each(function () { this.innerHTML = this.innerHTML.replace(regex, function(matched) { return "<span class=\"" + className + "\">" + matched + "</span>"; }); }); }; |
This is nice, because it uses a case-insensitive regular expression to find the word to highlight. However, there is a flaw. If you call this function on an element with non-text child elements, and the tag/attribute names or attribute values match the word to highlight, this function will mess up your HTML. We’d like it to apply only to text nodes.
Read more
Validate that URLs exist using jQuery / PHP
It would be nice to have a pure javascript method of validating that URLs exist. One imagines you could use an AJAX call and verify the HTTP status code (200, 404, etc.) returned. However, browser security does not permit cross-domain AJAX calls. So, this method would only work if you are validating that URLs exist on the same domain.
Perhaps there is a way to use a hidden iframe to test the existence of a URL. I am not aware of a way to get the HTTP status code of a page that loads inside of an iframe, though. I’m not sure it is possible. So you must rely on javascript plus a server-side programming language to perform this validation. I chose jQuery and PHP.
Prefetching Javascript and CSS
Prefetching javascript and CSS files can improve the page load times as users navigate your site. This creates a better user experience and may even improve your search engine rankings.
I’ll describe an easy prefetch technique useful in situations in which you are reasonably sure the user will navigate from Page A to Page B. This situation typically involves the user filling out a form. Chances are high that if a user begins to fill out a form, she will eventually submit it, arriving at Page B. If you prefetch resources that will be needed by Page B, it’ll load faster when the user navigates to it. This is a technique I’m using on our lifespan test.


